Friday, September 30, 2011

Feature Friday: Craft Nook

Throughout the week I featured things that I made/updated to put in my craft nook and now I get to show you how they all go together...

Ta-da!


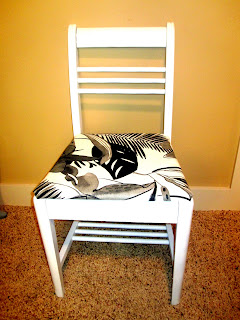
So, here's the breakdown.  The round frame was just under $1 at a garage sale.  The other frames we have had forever.  Hubs got the vase in Poland and I'm sure it wasn't cheap, but it was free to me. ;)  The candle holder on the wall (with the decor ball on it) was $1 at a thrift store.  The candle holders with the candles were a wedding present.  I got the shelves at a garage sale with a bunch of other things.  They probably cost $1.  The spritzer was left at our old house by the previous owners and I found it when we were moving out 2 1/2 years later.  I got the silver rose hanging thing on the right at a garage sale for $2.  The decor ball cost about $5.  The chair was $5 plus $5 for paint and $4 for the upholstery (and I have a yard minus chair seat left over).  The vanity was free but the stencil cost $3 and the paint was maybe $5.  

Grand total:  Somewhere around $32 for the entire nook (including furniture).  Yay for crafting!


Read the Decor Ball tutorial here.

Learn how to upholster a chair here.

And read all about the adventures in updating this vanity, including mistakes to avoid, here.

Linking up at the great Linky parties found at the bottom of the blog.  They are where I find most of my inspiration!  Check them out!

plus

Thursday, September 29, 2011

How To Reupholster a Chair 101

My very first upholstery project was a chair similar to what you see in this post.  It is a simple chair with an upholstered seat.  Nothing else.  No crazy cushions, no piping, just the seat.  I recommend this is how you start if you want to get into it.  Pretty soon I'll have an upholstery 401 class (or should I say, "upholstery by Kelli 401" since I have zero authority except this is what I've done).

You will need:
a staple gun
staples
upholstery material (I made the mistake of buying thin material)

note: If the cushion is in bad shape, get new foam (but it's expensive so if it just needs to be cleaned, do that).

Before: $5 garage sale purchase

After

Obviously in the before/after you can see that I painted the chair.  I'm not doing the tutorial on that but I sanded, primed and spray painted.

Step 1:
Take the seat off.  Most seats are screwed on so flip the chair over and unscrew it.

Step 2:
Have your material cut and ready (face down) and place the seat on the material with the cushion down.  You can just upholster over the old upholstery or you can upholster over the cushion and wood if you previously took off the old material.

Step 3:
Fold one side of the material up over the side of the seat and staple in the middle.
 

Step 4:
Staple on both sides.

Step 5:
Fold the other side up, pull so the material is tight, and staple in the middle.

Step 6:
Then staple the sides.

Step 7:
Fold the edge of the adjacent side in.

Step 8
Fold the material up as though wrapping a gift and staple the corner.


Step 9:
Do the same to the other edge.

Step 10:
Do the other side the same way.  Then staple between all the staples so the material is secure and tight.


Step 11:
Screw the seat back into place and enjoy your "new" chair!


Linking up at the great Linky parties found at the bottom of the blog.  They are where I find most of my inspiration!  Check them out!

plus

Wednesday, September 28, 2011

A Feature and A Recipe

First of all, I have something to show off.  My friend, Lindsay, inherited this dresser years ago and recently decided to give it some new life!  (She even told me that I partly inspired her, which is super flattering and what any DIY blogger wants to hear.)

Before

After

Orange!  Don't you just love it!  I do.  This "after" picture makes me so happy.  Great job, Lindsay!

If you'd like to be featured on The Turquoise Piano, just email your projects to kelli nielson @ yahoo.com (without spaces).

Now lets talk about me.  ;)

I LOVE chocolate chip cookies.  Actually, I love the dough.  Every night I take a scoop of cookie dough and put it in a tea cup, heat it in the microwave for 40 seconds and put ice cream on top.  Then I eat it's sugary goodness.  

My favorite cookie dough is Pillsbury's that you buy in the butter section of the grocery store but when I run out I have to make my own.  Oh I wish Pillsbury would share the recipe love.  But I did find one I liked a lot... and lost it during the move.  Then I found one online that I thought was worth a try. 

I pinned this a while ago and made them finally.  They are delish!  I'm not big on crunchy or fluffy and these are just the right amount of chewy (if you don't cook them too long).  If you are looking for a classic, these are for you!


Thick and Chewy Chocolate Chip Cookies
Ingredients:
2 cups plus 2 tbsp. all-purpose flour
½ tsp. baking soda
½ tsp. salt
12 tbsp. unsalted butter, melted and cooled until warm
1 cup brown sugar, packed
½ cup granulated sugar
1 large egg plus 1 egg yolk
2 tsp. vanilla extract

1 ½ cups semi-sweet chocolate chips  (I'm not big on lots of choc. chips so I did two small handfuls of milk choc. chips)

Directions:
Adjust oven racks to upper and lower-middle positions.  Preheat oven 325°.  Line two cookie sheets with parchment paper.

Whisk dry ingredients together in a medium bowl; set aside.  With electric mixer, or by hand, mix butter and sugars until thoroughly combined.  Beat in egg, yolk, and vanilla until combined.  Add dry ingredients and beat at low-speed just until combined.  Stir in chocolate chips.

Roll a scant half-cup of dough into a ball.  Holding dough ball in fingertips of both hands, pull apart into two equal halves.  Rotate halves 90 degrees and, with jagged surfaces facing up, place formed dough onto cookie sheet, leaving ample room between each ball.  Bake, reversing position of cookie sheets halfway through baking, until cookies are light golden brown and outer edges start to harden yet centers are still soft and puffy (approximately 11-14 minutes). Do not overbake.

Cool cookies on sheets until able to lift without breaking.  Transfer to a wire rack to cool. 
Source: adapted from Blonde Ambition in the Kitchen, originally from Baking Illustrated

Tuesday, September 27, 2011

Thumbtack Decor Balls

Do you Pinterest?  I am completely obsessed.  I think it is the best way to keep inspiration inspiration, you know what I mean?  A while ago I found these great thumbtack decor balls on a site, Landee See Landee Do, and I fell in love.  Now guess what... Kelli see Kelli do.  

She said that she used 100-150 thumbtacks per ball.  Well, she must have gotten a lot smaller balls than I did.  Mine took 300+ so this thrifty project turned out to be not so thrifty.  

To do it you start with the foam balls you can get at a craft store (unless you can think of something else -- tennis balls don't work, maybe try plastic Christmas ornaments or duct tape).  Then you push a tack in and keep going until the entire ball is covered.  


 To finish, I Mod Podged then entire ball.

I bought green spray paint to finish it but for now I'm leaving it silver.  It's peacefully resting on a candle holder on the wall in the craft nook, which I will fully reveal on Friday.


Linking up at the great Linky parties found at the bottom of the blog.  They are where I find most of my inspiration!  Check them out!

plus

Monday, September 26, 2011

Vanity Makeover

Thanks for visiting The Turquoise Piano!  I hope everyone had a great weekend.  Today I'm going to share this project that I've been working on for like ever.  

Picture it.  Christmas, 1991 (I think -- 1990 was when I got my first CD player so it couldn't have been that year).  I was eleven years old and I got this beautiful vanity.  I loved it.  My cousin had one and she was so cool so I was excited to enter her realm.  


Now fast forward 2.1 decades and both Nielson sisters (me and my sister, who will be 11 in November) and you have the same vanity, slightly abused, and very in need of an update.  I took it home from my mom's when we did her big basement makeover.

I started by removing the top drawers and wood thing and filling the holes and cracks with wood filler.

Then I spray painted the handles black.  I did it while they were still attached so I could get the screws too.

Then a couple of months go by and we move and try to organize.  Finally I pulled it out of the garage and sanded it with a fine grit sandpaper (the one just courser than the finest).  

I washed and wiped off all the dust and then spray painted the edges black.  You'll see why soon.

Then I painted all the drawers white.

Next, I spray painted the entire thing gray and put the handles back on.

And then I started distressing the edges by sanding them.  This is where the black paint underneath comes in.  You can see that the black shows through when I sanded the gray off.

Since stenciling has been all the rage, I decided to try it out for myself so I taped the stencil down and sprayed it white.

And felt like an impatient idiot for not taping it all down and getting white everywhere.

So I sanded and painted the top gray again.

And painted the inside white while I was waiting for the other paint to dry.

But apparently I didn't wait long enough because this is what happened when I sanded again to get the paint to look the same.  Gah!


So I sanded and painted the flippin' thing once again.

This time I used a brush to do the stencil.  I still didn't read the instructions though.  I guess it works best if you spray some "adhesive" spray to the stencil before putting it on the project.  Well, since I didn't do that this time it leaked.  I was going to have a nice, crisp flower but it ended up not being very crisp.  But listen, I wasn't going to start over.  I mean, how much paint could I go through on this project (good thing I got it on clearance at Lowe's)?  I didn't even want to know.  So I let it dry (really this time -- like over night) and sanded, but only enough to distress it and make the flower look like it's supposed to look distressed because, uh, that was the plan.  Yeah.  Then I distressed other parts of the top too but that's okay because the edges were distressed so it matches.  

And voila, you've got an aesthetically pleasing configuration of project the humans go nuts over.  Name that movie (okay, it's not the real version).  

I wanted to take some great pictures of it in a field in the evening but it was already upstairs by the time I took pictures and it is in it's final resting place with some other projects that I will reveal throughout the week.  On Friday you get to see the entire "craft nook" reveal.  I love it!  I hope you will too.


One more time:
Before
After

Hey, I started a facebook page.  You can get there through the link on the right side of my blog.  I'd love a "like" and I'd love it if you'd "follow" my blog at the top right.  Let me know and I'll be happy to return the favor!

Linking up at the great Linky parties found at the bottom of the blog.  They are where I find most of my inspiration!  Check them out!

plus

Related Posts Plugin for WordPress, Blogger...