Pin It
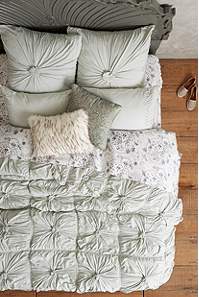
It's January 9th and I have finished two of my 12 must-do's of 2012 (2nd tutorial later this week). The first, this Anthropologie Rosette bedding knock off.
I made mine crib-sized for Morgan's bed (but it took just as long because the squares are so much smaller).
Here's the tutorial:
I used 1 twin flat sheet (bought at Walmart for $5) for the rosettes and 1for the back (the excess for the back was used for rosettes).
1 twin-sized batting.
The normal sewing stuff.
Lots and lots of white thread.
A pencil.
Whatever else I tell you I used later in the tutorial.
This is the sheet just after I took it out of the bag.
I
We cut a billion squares for the rosettes (63, actually). We did the squares 11 inches on each side so that when the rosette was done it would be 7 inches. If you do a king, do 16 inch squares (if you want).
Next we traced a DVD in the middle of the square. We used a fabric pencil (but when I finished at my house I just used a regular pencil).
I got my needle and thread (for this part I used a thick crocheting thread -- I think that's what my mom said it was).
Using big stitches, I sewed the circle by hand.
To make the rosettes I pulled the circle thread tight and poked the center of the bubble down and sewed through it. If that doesn't make sense and you are doing this you can email me (but I think it will make sense when you are doing it).
Then I used the sewing machine to sew the edges of each square -- all 63 of them times 4! I sewed so I could gather them. Sorry if I'm not using sewing terminology. I'm not really a seamstress. At all.
Here is one all gathered so that each side is 7 inches.
Next I sewed (and when I say I, I mean my mom did at least half) the squares together in rows. Mine ended up being 9 squares per row and 7 per column.
After I turned it right side out I hand sewed the edge that wasn't sewn.
Would I do this again? Well, I love the result but it took a long long time to make (and long projects aren't my fave) so I'm not sure. But probably.
What do you think?
Pin It
I'm entering:


Wow, i wish my sewing skills were awesome like yours because that looks amazing!!
ReplyDeleteI think it's great - and I would love watching anyone else do it, but probably not something I would do. It looks like it takes a lot of patience and perseverance. Good job!
ReplyDeleteKELLI!!!!!!!
ReplyDeleteI will be trying this one at some point, using your tut! Rocked it, Girl!
Visiting from Dashboard,
WOW (speachless)
~Suz in NW Illinois
It looks AMAZING!!!!!!! You are so talented
ReplyDeleteI am pretty much in LOVE with it! Great job!
ReplyDeleteThat turned out so cute. Way to go. I bet it looks so cute in Morgans room. What a luck girl.
ReplyDeleteWow! So impressive! (be glad I didn't insert the easy pun there. I thought about it ; )I don't think I would've had the patience to make such a project. I know I wouldn't have. You did an amazing job. An heirloom for sure.
ReplyDeleteLOVE IT!!
ReplyDeleteWOW. I don't know what else to say....
ReplyDeleteThis is just beautiful! I can see how it took a lot of time, so worth it! I'll be featuring it next week, thank you for linking!
ReplyDeleteXO
Kristin
It is so beautiful - totally worth all the work!
ReplyDeleteI can't imagine the work involved, but wow, it's gorgeous! I would love for you to link up with my party at http://anoriginalbelle.blogspot.com/2012/01/make-it-yourself-monday-10-link-up.html
ReplyDeleteHave a great day!
It is very beautiful and worth every minute spent. Thanks for sharing!
ReplyDeleteIt turned out so awesome though!! The long projects are usually the good ones! LOVE this bedding! Very easy tutorial too!
ReplyDeleteIt looks great! I probably wouldn't have the patience, but your tutorial makes it look like something even someone with limited sewing skills like me could do!
ReplyDeleteWell, that is so beautiful--you get an awesome job! I thought I was following you...but maybe I'm not. Off to go check!:) You are very talented!
ReplyDeleteWEll that is just wonderful...adorable and stunning..and well worth the effort..good for you!
ReplyDeleteyou did an amazing job, i have been wanting to try this xxx
ReplyDeleteLove this - now I have a question for you - did you consider just drawing a grid on the sheet, rather than cutting it into squares and reassembling? I examined this in Anthro and that's how I imagined to attempt it - either way, your's is just lovely!!
ReplyDeleteLove it! Im doing my cousins nursery for her and would love to try this! Im not a long project kinda girl either, so we'll see. Thanks for the tutorial....im your newest follower!
ReplyDeleteJill@ iknowtheplansihave4you.blogspot.com
You did awesome! I feel the same way about LONG projects though....I mean that looks amazing and I would LOVE to have something like that, but I would get so tired of it by the end and not even want to do it! I am jealous of how good that looks though! Great job...you should make another and do a giveaway for it! :-) Maybe I would win it then not be jealous anymore! ha ha you should be proud of your work!
ReplyDeleteThat turned out really pretty! Thank you for joining me at Home Sweet Home!
ReplyDeleteSherry
I literally JUST blogged about how I really wanted that rosette Anthro bedding!! If only I knew how to sew to make my own...
ReplyDeleteYou did an awesome job...I love it. I just got a new sewing machine so I will have to try this...when I learn how to use the thing. Stop by anytime, Lori
ReplyDeleteYour bedding is beautiful and thrifty! Super tutorial!
ReplyDeletethanks for linking up and linking back to catch as catch can.
gail
Gorgeous! I think you did a great job. Looks like it would take quite a while to make.
ReplyDeleteWow, so beautiful. I also don't like long projects. It is so beautiful it must of be worth it. I made 1 quilt once, it was beautiful, I still use it, but I would never make one again, it had over 300 pieces - UGH! so my motto is been there done it. Check it off my list and move on to something easy. Thanks for sharing this inspiration over at Sunday's Best!
ReplyDeleteIt's gorgeous, and I have this on my to do list already, but it seems to take a bit long so i may take a shortcut on mine. The result is amazing though on yours - wow!
ReplyDeleteBEAUTIFUL! I pinned this!
ReplyDeleteGREAT job!
ReplyDeleteI have the sheets to do mine and am gearing up for it..really...truly (I think). We'll see. It's kind of far down on the list because it's for the Master Bedroom, which is perfectly functional if not fabulously gorgeous at the moment.
But I love the idea of doing a mini-version.
Thanks for linking up with Feature Friday Free-for-All!
That is cool. I always wondered how it was done.
ReplyDeleteIt's beautiful! I really love it!
ReplyDeleteSo beautiful! I can't wait to do it! What would be the measurements and number of squares for a twin size?
ReplyDeleteI would probably start with 13x13 squares and when they are ready to sew together they will probably be 9x9. I'm not totally sure because I kind of winged it with mine. Good luck!
Deletesoooooooooooooooooooooo pretty!!!!!!!!!!!! I am in love.
ReplyDeleteJaime
Lovely!!!... I'm tempted to give this a try on a queen size blanket.
ReplyDeleteIt is beautiful-- but I know what you mean about long projects. Whew! You finished and that's the important thing. Thanks for stopping by and sharing with my readers at Sassafras Salvation.
ReplyDeleteThis is just beautiful! My daughter is dreaming of a redo for her bedroom and this would be perfect! She has a twin size bed. Now, I'm no sewer. Would you consider making it? When you have a chance, shoot me an email (thetablescaper@gmail.com) and let me know you'd charge, if you're interested.
ReplyDeleteThanks.
- The Tablescaper
Simply gorgeous!
ReplyDeleteLove your quilt -- you [& Mom] did a great job. Thanks for the tutorial.
ReplyDeletedawnedesign.net
Wow...just wow.
ReplyDeleteThis is amazing! High five, girl!
ReplyDeleteThis is just beautiful!! Saw it over at Sew-Vivor and new I would love your blog! Glad to be your newest follower!!
ReplyDeleteJen @ F5
hi,
ReplyDeleteHave a cpl of questions. how long did this take for you to do. Wondering if I alternated black and white for this on a king size would look good? and is there a tutorial? Love love it!!!
That is amazing. Lucky you to have a mom willing to help! I feel very inspired, thank you :)
ReplyDeleteThat looks great! I was actually just in Anthro with my sister. She was showing me this bedding to see if I could make a knock-off! Thanks for the tutorial, you are saving me so much figuring!
ReplyDeleteThis is fabulous!!! Awesome job :)
ReplyDeleteThat looks wonderful! But yeah, I don't know if I would have the patience.
ReplyDeleteIt beats paying the price of one from Anthro....I have more time than $...your version is stunning!
ReplyDeleteI am going to do this for my queen-size bed. I actually like your version better than the anthropologie original :)
ReplyDeleteThis is the best hack I have seen. I think the way finished the squares makes the difference.
ReplyDeleteIt’s really interesting to read your content and attracting for the new reader. Really appreciable I will definitely inform other reader to read your content compulsory bedding fitted sheet Windsor Store has created beautiful home decoration products for each corner of the house. What's more, brighten up your home with table lamp and floor lamps.
ReplyDelete